SharePoint on Azure : High availability and DR provisioning
Sharepoint DR strategy can be effective if it meets two measures for a Business Organisation Recovery Time Objective (RTO) and Recovery Point Objective (RPO).
RTO and RPO represent the downtime cost to the organisation in case of a disaster.
Failure of critical application could lead to loss of the application service or loss of data.
Following are the Standby data center recovery options
Cold standby. The DR data center can be available within hours or days.
Warm standby. The DR data center can be available within minutes or hours.
Hot standby. The DR data center can be available within seconds or minutes.
For availability across data centers for service applications that can be run cross-farm it is recommended to run a separate services farm.
For services that cannot be run cross-farm, they should be checked for business value in DR farm , whether log shipping, asynchronously mirroring, or replication using asynchronous commit is supported and whether the service application can run against read-only databases.
To configure ADFS for SharePoint follow the below procedure:
ADFS Server side Config
Configure a relying party
The relying party defines how the AD FS recognizes the relying party and issues claims to it.
To configure a relying party :
Verify that the user account that is performing this procedure is a member of the Administrators group on the local computer.
Open the Active Directory Federation Services (AD FS) Management console.
In the left pane, expand Trust Relationships, and then double-click the Relying Party Trusts folder.
In the right pane, click Add Relying Party Trust. This opens the Active Directory Federation Services (AD FS) 2.0 configuration wizard.
On the Welcome to the Add Relying Party Trust Wizard page, click Start.
Select Enter data about the relying party manually, and then click Next.
Type a relying party name and click Next.
Make sure Active Directory Federation Services (AD FS) Profile is selected, and click Next.
Do not use an encryption certificate. Click Next.
Click to select the Enable support for the WS-Federation Passive protocol check box.
In the WS-Federation Passive protocol URL field, type the name of the Web application URL, and append /_trust/ (for example, https://YourWebAppName/_trust/). Click Next.
Type the name of the relying party trust identifier (for example, urn:sharepoint:YourWebAppName), and click Add. Click Next.
Select Permit all users to access this relying party. Click Next.
On the Ready to Add Trust page, there is no action required, click Next.
On the Finish page, click Close. This opens the Rules Editor Management console. Use this console to configure the mapping of claims from an LDAP Web application to SharePoint Server.
Configure the claim rule
Verify that the user account that is performing this procedure is a member of the Administrators group on the local computer.
On the Issuance Transform Rules tab, click Add Rule.
On the Select Rule Template page, select Send LDAP Attributes as Claims. Click Next.
On the Configure Rule page, type the name of the claim rule in the Claim rule name field.
From the Attribute Store drop-down list, select Active Directory.
In the Mapping of LDAP attributes to outgoing claim types section, under LDAP Attribute, select E-Mail Addresses.
Under Outgoing Claim Type, select E-Mail Address.
Under LDAP Attribute, select Token Groups-Unqualified Names.
Under Outgoing Claim Type, select Role.
Click Finish, and then click OK.
At Choose Rule Type, select Send LDAP Attributes as Claims and click Next.
Create the new rule as follows:
Export the token signing certificate
Verify that the user account that is performing this procedure is a member of the Administrators group on the local computer. For additional information about accounts and group memberships, see Local and Domain Default Groups
Open the Active Directory Federation Services (AD FS) Management console.
In the left pane, click to expand Service, and then click the Certificates folder.
Under Token signing, click the primary token certificate as indicated in the Primary column.
In the right pane, click View Certificate link. This displays the properties of the certificate.
Click the Details tab.
Click Copy to File. This starts the Certificate Export Wizard.
On the Welcome to the Certificate Export Wizard page, click Next.
On the Export Private Key page, click No, do not export the private key, and then click Next.
On the Export File Format page, select DER encoded binary X.509 (.CER), and then click Next.
On the File to Export page, type the name and location of the file you want to export, and then click Next. For example, enter C:\ADFS.cer.
On the Completing the Certificate Export Wizard page, click Finish.
Above rules should map exactly to what we specified in the PowerShell script in the next section, the outgoing claim of UPN must never be null. Otherwise, there will be an authentication failure.
Sharepoint side configuration
The following commands must be customized to fit the environment and executed on “SharePoint Management Shell”
$cert = New-Object System.Security.Cryptography.X509Certificates.X509Certificate2(“c:[YOUR_STS_SIGNING_CERT].cer”)
$map1 = New-SPClaimTypeMapping “http://schemas.xmlsoap.org/ws/2005/05/identity/claims/upn” -IncomingClaimTypeDisplayName “Account ID” –SameAsIncoming
$map2 = New-SPClaimTypeMapping “http://schemas.microsoft.com/ws/2008/06/identity/claims/role” -IncomingClaimTypeDisplayName “Role” –SameAsIncoming
$map3 = New-SPClaimTypeMapping “http://schemas.xmlsoap.org/ws/2005/05/identity/claims/emailaddress” -IncomingClaimTypeDisplayName “Email Address” –SameAsIncoming
$realm = “urn:myapp.sharepoint”
$signinurl = “https://[YOUR_SERVER_NAME]/adfs/ls/”
$ap = New-SPTrustedIdentityTokenIssuer -Name “ADFS” -Description “ADFS Federated Server” -Realm $realm -ImportTrustCertificate $cert -ClaimsMappings $map1, $map2, $map3 -SignInUrl $signinurl -IdentifierClaim $map1.InputClaimType
This script maps three claims that may be received by the ADFS SAML token (inbound claims) to SharePoint claims. Recall in the screenshot from Step 1 that SharePoint always issues its own claims. Hence, the requirement to map values from inbound tokens. In the last line, the first mapping (http://schemas.xmlsoap.org/ws/2005/05/identity/claims/upn) is defined as the identifier claim. This means the claim uniquely identifies the user to SharePoint and therefore may never be empty. All other claims (role and email) are optional.
In order for ADFS to work with SharePoint, the web application must be enabled for SSL.
Create a trust relationship between SharePoint and AD FS
Associate a Web application with a trusted identity provider
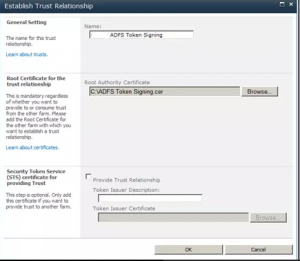
Open Central Admin and select Security on the left hand navigation. At the next page, select Manage Trust in the General Security section. Then, click “New” in the upper left hand corner and supply a name and specify the ADFS token signing certificate (end of Step 2 above) as seen in the following screenshot.
Prepare the Web Application
To configure an existing Web application to use SAML sign-in, the trusted identity provider in the claims authentication type section needs to be modified.
To configure an existing Web application to use the SAML Provider
Verify that the user account that is performing this procedure is a member of the Farm Administrators SharePoint group.
In Central Administration, on the Home page, click Application Management.
On the Application Management page, in the Web Applications section, click Manage web applications.
Click to select the appropriate Web application.
From the ribbon, click Authentication Providers.
Under Zone, click the name of the zone. For example, Default.
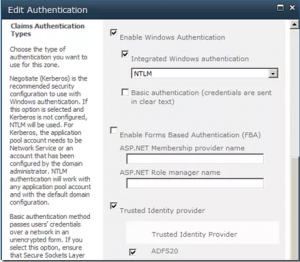
On the Edit Authentication page in the Claims Authentication Types section, click to select the new Trusted Identity provider name check box.
Navigate to Web Applications Management, highlight the web application, and click the Authentication Providers button in the ribbon. You can see your new provider in the Federated Identity Provider section of the Edit Authentication window.
Update the Default zone in Alternate Access Mappings so that https is enabled and users are redirected, if necessary.
Create a claims aware application, grant claims users permissions to access the site.
When adding a site collection administrator, you must enter the name in the format of your identity claim.
Master Page and other SharePoint code should be Claims aware.
SharePoint products is one of several applications that must be recovered in the event of a data center shutdown that qualifies as a disaster.
